By following this quick tutorial, you will learn how to create an email address in Plesk.
Note: An email address is sometimes referred to as; an email account, a mailbox, a domain mailbox, etc.
Table of contents
- Watch the video: How to create an email address in Plesk
- Steps for creating an email address for your domain
- Conclusion
Watch the video: How to create an email address in Plesk
Steps for creating an email address for your domain
1. Log in to the Plesk hosting control panel of the subscription you have with us
Note: If you are not sure how to do this, then follow the instructions outlined in the tutorial found here:
https://www.cloudmatrix.co.za/knowledgebase/4886/How-to-log-in-to-Plesk.html
2. Once logged in, click on "Mail" tab, located in the sidebar menu of the Plesk hosting control panel graphical user interface.

3. In the main content area, click on the blue "Create Email Address" button.
![]()
4. In the main content area titled "Create Email Address", select the "General" tab and fill in the following details in the required form fields:
- Email address: Enter the user part of your new email address. If you have multiple domains under your subscription, be sure to choose the correct domain from the drop-down menu, just to the right of the @ symbol.
- Password: Enter a strong password, or click on the "Generate" button to have one generated for you. You can then click on the "Show" button to copy the newly generated password for later use.
- Confirm password: Repeat the password used above, or paste the generated password from your clipboard.
- Mailbox: Choose a size for this mailbox. The "Default size" is set to "Unlimited". You can also choose a specific size, by defining the amount of storage space after selecting "Another size". You can choose KB, MB, GB or TB respectively.
Note: The mailbox size allocated here defines only the 'maximum' storage this mailbox is allowed to use in total. The actual storage space allowed for all services related to your domain is defined by your subscription.
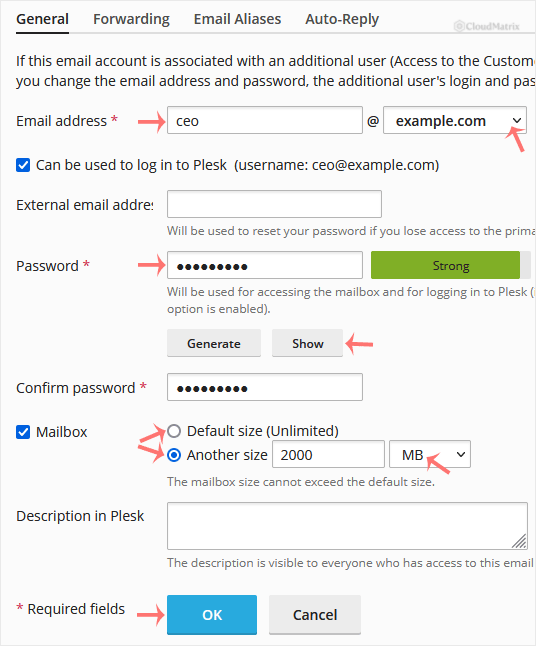
5. Finally, click on the "OK" button to complete the process.
Conclusion
That's it!
You can now start sending and receiving emails using this unique email address. You can either;
- Use the webmail interface for your mailbox, or
- Configure a good email software (a.k.a. a mail client) like Thunderbird or an old legacy mail client like Outlook, using the new email address, the password you used to set up the mailbox, and possibly, the mail server settings for this mailbox.
Remember to search through our online knowledgebase for other great tutorials.